What’s New In NXPowerLite Desktop Mac 10
Version 10 of our file compressor, NXPowerLite Desktop is now available for Mac, and it has taken a big leap forward. While this new version boasts a plethora of improvements that you can read about below, we take immense pride in our solution for files that don't reduce.
The number one request from our customers has been to improve what happens when a file does not compress enough, or if it does not compress at all. It used to be both cumbersome and challenging to figure out what to do next - whether that was trying different settings or investigating to find out why the file hadn’t reduced as much as they needed.
People wanted a way to quickly experiment with different compression settings. A way to see why some compressed files were still too big, and some guidance on how to fix it.
So, we focused on 3 things:
Make it fast and easy to retry a file
Avoid having to adjust custom settings
Guide people on what they can do next
Retry files
We’ve changed 2 things that make a big difference to this workflow.
First, we’ve altered the restart behaviour. Before, it would clear the list every time, but now, if you create an optimised copy and click ‘Restart’, NXPowerLite will keep the file in the list. So, if you want to try a different Optimize profile, this saves you finding and adding the file again!
Second, we added two new optimise profiles that give you a quick place to go if the default profile (Balanced) doesn’t give you what you want. Basic will compress more lightly, preserving more quality, and Strong throws everything at reducing the file.
Files that don’t compress
If a file doesn’t compress it is usually because it contains some media that NXPowerLite doesn’t support. To help when this happens we’ve included 2 new changes.
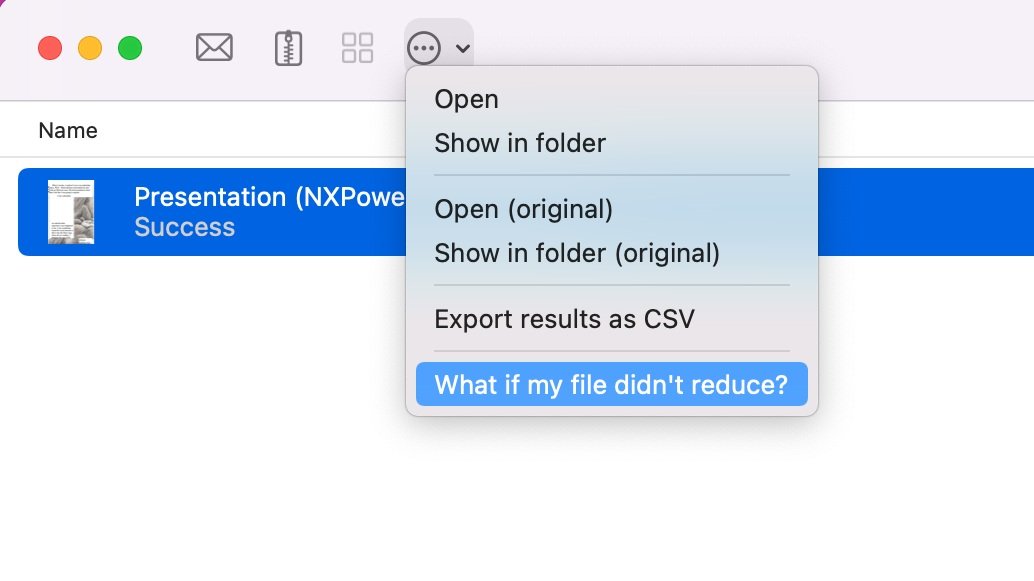
First, we added menu links for each file format to new pages on our site that we will keep updated with the latest guidance on how to troubleshoot and fix all the size problems we know about for each specific file format. These can be accessed from the “What if my file didn’t reduce?” option via the ellipsis or right-click menus.
Because there can be many reasons why a file doesn’t compress, we've focused on giving you the information and tools to troubleshoot each file by yourself on a case-by-case basis. Here are the guides to help you manually reduce file size when NXPowerLite struggles:
PowerPoint presentations (PPTX)
And for Office files, we have written a guide on How to unzip Office files on macOS. This is really handy if you want to see what content elements are bloating the size of your file.
For PDF, we currently link you to our online PDF analyser on WeCompress, which gives a content breakdown in files up to 200 MB. Eventually, we hope to integrate analysis tools for PDF and Office documents directly inside NXPowerLite.

Finder
We previously made some changes in v9 that made it possible to choose your settings when using NXPowerLite with Finder - however, it seems some people didn’t spot it, and others didn’t realise you could override that behaviour. We also have a tip for how you can consider using it to make JPEG resizing easier.
If you want to configure it to always use the same settings you can do this in Preferences - we’ve made this a little clearer in version 10, as you can see below. Either pick an existing profile or set up specific settings to use for Finder.

Our tip for JPEG resizing is to create a range of profiles (or import the ones we’ve created here) that have JPEG resizing set to different resolutions e.g. 4k, 1080p and 720p. Call the profiles, for example, “Finder: JPEG 4k”, “Finder: JPEG 1080p” and “Finder: JPEG 720p”. Then, when you next select a collection of JPEG images to resize, you can pick the size quickly and decide if you want to make new files or replace the originals and hit go. Preconfiguring these profiles will save you a bunch of time when doing this in future.
Context menus
Doing anything with your files from the Results screen was pretty cumbersome in earlier versions. We’ve made the command bar clearer and more intuitive. We’ve also added right-click context menus, so you can now right-click on a file and email it or open its location. This also helps when you try a file a couple of times and then want to remove any copies - simply right-click on the file, choose ‘Show in folder’ and then delete the files you don’t need.

Check for updates
It has also been mentioned once or twice that we haven’t had an easy way to check if there has been an update issued for the software. Despite only 10 major versions, we’ve released 100s of minor updates, and as these often contain helpful bug fixes, it’s well worth making sure you have the latest version.
We’ve now added an option to the menu that when clicked will take you to a web page that will let you know if there is a newer version than you currently have installed, tell you what’s changed, and give you links to download and install it.
Faster and better compression
NXPowerLite is a file compressor, so no major update would be complete without us also upgrading the compression engine. This time we’ve made some significant improvements that will, particularly, affect Office files. In no particular order:
Previous versions of NXPowerLite could be really slow when compressing Office files, especially if they contain many images or large content elements. Some files would appear to get stuck towards the end of processing when NXPowerLite was saving the file. We are happy to report that we found this issue, and now these files are processed much faster, so even larger Office files are compressed in short order.
Support for new-style embedded objects in PowerPoint that were being missed by earlier versions of our software.
Added the ability to remove content from Word files that is only used to support viewing on Word 2007 and earlier.
New setting: Remove Excel data from charts
We added a feature to strip out Excel data from charts in version 9 and rolled this into the Flatten Embedded Objects setting. This confused a few people who unexpectedly found that the data was gone from their charts. In version 10 we’ve separated out this setting so that it can be controlled independently.

All the little things...
It’s not only about the big features — we also made lots of smaller things better too.
When removing EXIF data from JPEGs, the orientation data is retained meaning optimized photos will display with the correct orientation.
We’ve added common resolution names to the list of resolutions e.g. 4k, 1080p etc. to make it easier to pick out the one you need
NXPowerLite now uses the system thumbnails for each file added to the app.
Removed the in-built help and switched to online context-sensitive support articles containing the latest information.
We’ve switched out the old icons and generally updated to a more modern styling.
Lots of visual tweaks and polishing
We crushed many bugs, some big, some small
In summary
In version 10, we’ve upgraded the compression engine as always, provided features to help when files don’t compress enough, and also improved the ease of interaction with a host of small improvements that should just make the product feel easier to use. Thanks as always for your support, and we hope that you enjoy this new version of NXPowerLite… please tell all of your friends 😊